Nowadays the Ansible community.general collection has a Proxmox inventory source directly integrated. Using this we can use our Proxmox (non-)Cluster as the direct source for our Ansible Playbooks without the need to always re-define the existing VMs and Container in a separate inventory-File.
For the sake of simplicity this post only shows the usage with a simpleansible -m ping. But after this works fine, you can use your new inventory configfile for the ansible-playbook command.
Preparation
In the configuration that is shown here, there are a few (but simple) things that I’m assuming:
- You’re using Tags to distinguish between operating-systems
- If it’s a normal (qemu) VM, then you installed and activated the Agent everywhere
- You’re using SSH-Keys to access everything
All of these things are just showing the usage in my own environment. Everything can be fitted to your specific need with just a bit of elbow grease. So just start testing, and when you’ve got a feeling for it then just play around with it.
Tags
They’re great! Use them 😇
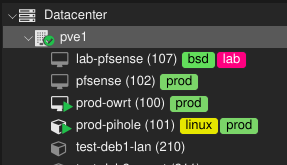
Maybe you’ve seen these before or even used them.
The config down below automatically converts them into groups that are usable in ansible. The Tags from this screenshot would be translated into:
- tag_bsd
- tag_lab
- tag_prod
- tag_linux
As you maybe know, when calling ansible with the -l or --limit parameter, you can specify a pattern, that can restrict the current call to a specific list of hosts.
Examples for this would be:
proxmox_usable:&tag_prod- …
Agent
You should install the Agent in all QEMU-based VMs! (And yes, you can restrict its capabilities in the config).
To use it here’s the short version for execution in the VM (for Debian-based systems):
apt-get install qemu-guest-agent
systemctl enable --now qemu-guest-agent
After this you should enable the usage of the Agent in the VM-Settings:
Options -> QEMU Guest Agent: 'Use the QEMU Guest Agent'
For more information about this please look into the Proxmox Wiki
Ansible Inventory
For the sake of this small tutorial we create a new empty Folder where we put all of our files. You can do this directly in another (already existing) Ansible Project, but beware that we will change a bit of your ansible.cfg.
Configuration-Files
Let’s start with the ansible.cfg, which helps us a lot with usability in this.
All of the set values can (and should) be looked deeper into when you’re trying to use this method for your production-level Playbooks.
[defaults]
inventory = ./my.proxmox.yml
fact_caching_connection = .cache
retry_files_enabled = False
host_key_checking = False
forks = 5
fact_caching = jsonfile

[inventory]
cache = True
cache_plugin = jsonfile

[ssh_connection]
pipelining = True
# ssh_args = -F ssh_config
The main points in this file are:
- The default inventory-config is your yml-File (you can specify others via the
-i <filename>Parameter for the tools) - We enable local caching (so we don’t always have to re-ask the server)
- You can specifiy your own ssh-config with for example your own host or default key setups.
As the last file, we create our Inventory-Configuration (that we already specified) which we can save as my.proxmox.yml .
# my.proxmox.yml
plugin: community.general.proxmox
user: root@pam
validate_certs: false
# username: root@pam
# password: xxxxxxxxxxx
# url: https://192.168.1.5:8006

want_facts: true
keyed_groups:
  - key: proxmox_tags_parsed
    separator: ""
    prefix: tag_
groups:
  proxmox_use_agent: proxmox_agent == "1"
  proxmox_usable: (proxmox_status == "running") and ('linux' in (proxmox_tags|split(';'))) and (( proxmox_vmtype == "lxc" ) or ( proxmox_vmtype == "qemu" and proxmox_agent == "1" ))
#  webservers: "'web' in (proxmox_tags_parsed|list)"
#  mailservers: "'mail' in (proxmox_tags_parsed|list)"
compose:
  ansible_host: proxmox_net0["ip"].split('/')[0] if 'ip' in proxmox_net0 else proxmox_agent_interfaces[1]["ip-addresses"][0].split('/')[0] #
  # ansible_port: 2222
want_proxmox_nodes_ansible_host: true
This Inventory-Configuration-File is the main factor for getting everything to work.
Tests
Let’s try it out:
# ansible-inventory -i my.proxmox.yml --listThis should give us a inventory-File like structure as json with some „hostvars“ for every vm/container. After that we have an object called „all“ where we should find all available groups that we can use in our ansible „limit“ param.
// ...
"all": {
    "children": [
        "ungrouped",
        "proxmox_all_lxc",
        "proxmox_all_qemu",
        "proxmox_all_running",
        "proxmox_all_stopped",
        "proxmox_nodes",
        "proxmox_discovery_lxc",
        "proxmox_discovery_qemu",
        "tag_linux",
        "tag_docker",
        "tag_prod",
        "proxmox_usable",
        "proxmox_use_agent",
        "tag_windows",
        "tag_k8s",
        "proxmox_pool_infra",
        "proxmox_pool_lab",
        "proxmox_pool_non_critical"
    ]
}
// ...
# ansible -m ping "proxmox_usable:&tag_prod"
prod-pihole | SUCCESS => {
    "changed": false,
    "ping": "pong"
}